The website logo Fishing stuff main website title logo

Slider Foat

...'sliding floats, what's that?' 

Fishing the Slider Float

"Many anglers try the Slider once, get in a tangle, and never try it again. Fished correctly, however, a Sliding Float makes light work of deep water."

Slider Float ...'an introduction'

A much neglected method, even by otherwise quite experienced and proficient anglers, the Slider Float allows you to fish deep water without having to fix the float so far from the hook that casting becomes at best difficult and at worst impossible.

Fail to master the Slider Float and you could miss out on a bumper catch the next time you are faced with deep water. You can Leger, of course, but if Legering doesn't work and you can't fish the Slider Float, you're stuck.

How the slider float works?

A Sliding Float slides on the line by virtue of one or two small eyes, depending on whether it is a Sliding Waggler Float for still and slow water (one eye, in the base of the float) or a Sliding Balsa Float for fast-flowing water (two eyes: one at the base, the other on the side, near the top).

When you cast, a Sliding Float hangs only a few feet above the hook, prevented from sliding all the way down by Shot. In the water, the Shot pull the line through the eye or eyes until the Sliding Float is cocked by a Stop Knot at the desired distance from the hook - usually the full depth of the swim.

When to use the slider float?

The most common misconception about the slider is that you only fish it when the water is deeper than the length of your rod.

A 13ft (3.9m) rod might mean that you can fix a float 13ft (3.9m) from the hook, but you can't cast comfortably with the float jammed against the top rod ring.

A good rule to remember, in all aspects of angling, is that if you feel comfortable your performance is enhanced.

 So, if you are faced with a fishing swim 10ft (3m) or more deep, consider using a Slider Float.

Sliding Waggler Floats

You can use any Bodied or Straight Waggler as a Slider Float, so long as it's semi-loaded.

Semi-loading ensures the float stays with the shot throughout the cast.

If you try to use an unloaded Waggler as a Slider Float it tends to slide up the line, away from the shot, in mid-cast, affecting accuracy and distance, and causing tangles.

As a rule, use a float that takes at least a further 2AAA shotting on the line, because there has to be enough weight to pull the line through to the Stop Knot.

Adapting waggler floats

These days you can buy a wide range of semi-loaded Waggler Float from your local tackle shop. Should you have any difficulty in finding them you can easily adapt an unloaded Waggler Float yourself by twisting out the plastic peg in the base and replacing it with a length of 3mm (1/8in) brass rod. 

This should be from 2.5-5cm (1-2in) long, depending on the size of the float. Glue it into the base of the float, leaving about 13mm (1/2in) showing. On to this you can then put an adaptor.

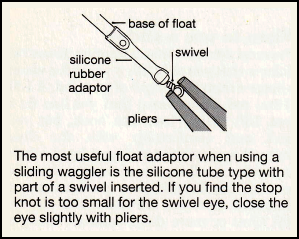
The best type of adaptor is a silicone tube with part of a swivel inserted. The hole of the swivel is usually big enough to allow free passage of the line but small enough to catch the stop knot.

'Shotting Up'

Once you have attached your reel and threaded the line through the Rod Rings, remove the last 15cm (6in) or so of reel line and use it to tie on a sliding stop knot about 2.7m (9ft) above the end of the reel line.

Then thread the float on the line and tie on the Hook Length. 

You can now 'shot up' your float as if you were fishing a 1.5-1.8m (5-6ft) deep swim.

Stop Knot: 

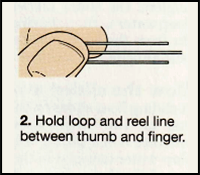
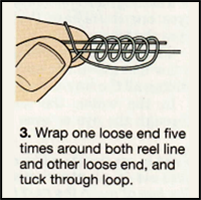
The simple stop knot is the key to slider fishing.

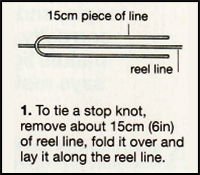
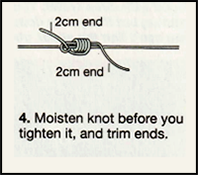
Loose Ends: Leave 2cm (1 in) long loose ends when you trim the Stop Knot. If you trim it any closer it can catch in the rings and, if the swim so deep that the knot is the reel, trap line against the spool.

Check the Wind

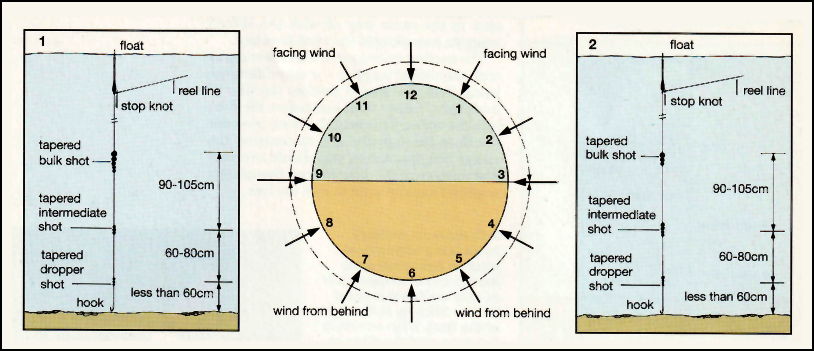
Before you test the depth of your swim, carry out the following routine.

Imagine you are standing on a clock face at 6 0'clock, with where you want to cast to at 12 0'clock. Note the direction of the wind.

If it is blowing from any point from 6-3 or 6-9 0'clock, regard this as a wind from behind and use the shotting pattern shown in Wind direction, diagram 1.

If it is blowing from any point from 12-3 or 12-9 0'clock, regard this as a facing wind and use the shotting pattern shown in Wind direction, diagram 2.

  • The more the wind is from behind, the less intermediate and dropper shot you need - down to one of each, even. But always taper shot spacings towards the hook (1).
  • Standing at 6 0'clock and casting to 12 0'clock, a wind from 6-3 or 6-9 is from behind, one from 12-3 or 12-9 a facing wind. If the wind is blowing from the right, cast from over your left shoulder, and vice versa (above).
  • The more the wind is in your face, the more intermediate and dropper shot you need to avoid tangles when you cast. Again, taper shot size and size and spacings towards the hook (2).

Casting

You must use the overhead casting technique. If the wind is blowing from the left, cast from over your right shoulder.

If it is blowing from the right, cast from over your left shoulder. 'Feather the line' to check the float just before it hits the water.

This ensures that the intermediate and dropper shot carry on past the float in a straight line, so avoiding tangles.

Cast past where you want to fish, so that the line sinks as you wind the float into position.

Then open the bail arm to allow line to peel off the reel as the bulk shot sinks your Hook bait.  

'Plumbing Up'

Rather than struggle with a Plummet on the hook, plumb the depth of your swim by trial and error.

Make a number of trial casts, moving the Stop Knot a few inches up the line each time until the 'dropper shot' just rest on the bottom of the swim and the float doesn't quite cock properly.

Then note the length of line between the hook and the dropper shot. Let's assume it's 45cm (18in). If you want the hook bait to trip along the bottom of the swim, move the Stop Knot down 45cm (18in).

If you want to fish the hook bait over depth, move the Stop Knot down 15-30cm (6-12in).

Counting for Bites

Because the float cocks in three definite stages you can spot bites on the drop. This you do as follows:

Remember these numbers when you actually start fishing with a Baited Hook.

Then, if you count to either number and the float hasn't settled in the usual manner, a fish has probably intercepted your hook bait on the drop, so STRIKE!

  • Look carefully at the ‘Spotting Bites on the drop’ sequence of below. Once the bulk shot has registered (1), start counting.
  • After a few casts (with NO bait on the hook) you will find that the setting of the float tip in (2) - with the intermediate shot registering - is reached on the same number each time. 
  •  Likewise, the setting of the float tip in (3), with the dropper shot registering, is reached on the same number each time.

Spotting bites 'on the drop!'

Fast Water

Top and bottom Sliding Floats for running water are rarely found in tackle shops nowadays, but you can easily adapt ordinary Balsa Floats yourself by glueing or whipping on small eyes.

Sliding Balsa Floats don't have to be semi-loaded, though some anglers find them easier to cast if they are. Try both, to see which type you personally get along with best. Semi-loaded or not, like Sliding Wagglers they should take at least 2AAA shotting on the line for best results.

Adjust the intermediate and dropper shot in the same way as with the Sliding Waggler Float, according to the wind direction.

The casting technique is also the same as with the Sliding Waggler Float, the only difference being that you should feather the line in mid-flight, rather than just before the float hits the water.

This way, the hook precedes the float through the air, minimizing the risk of tangles.

Again, you should overcast and retrieve to the desired spot, though you wouldn't usually want to sink the line.

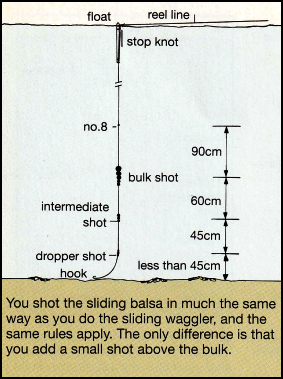
Shotting is much the same as for the Sliding Waggler Float, the only difference being the addition of a small shot above the bulk, to keep the float and bulk apart during the cast. This is essential whenever you use a float attached top and bottom, otherwise the hook tends to wrap itself around the top of the float in mid-air.

Sliding Balsa Float

If you are a float-making enthusiast, you can easily make your own sliding balsa floats and customize them to suit the waters you fish. 

To make an ordinary Balsa Float into a Sliding Balsa Float, whip on two metal eyes, having first bent them over at right angles to prevent the line sticking to the side of the float. Whip one on at the base, and the other at the side, near the top.

You shot the Sliding Balsa Float in much the same as you do with the Sliding Waggler Float and the same rules apply. The only difference is that you add a small shot above the bulk shot.